Synqyo helps you find the perfect meeting time. Create an availability
poll, invite participants, and everyone marks when they are free —
Synqyo highlights the slots that work for the whole group.
Create a poll with your date range and time settings.
Add participants — registered users, email invitees, or guests.
Share each personal link and collect responses.
Pick the slot where availability overlaps.
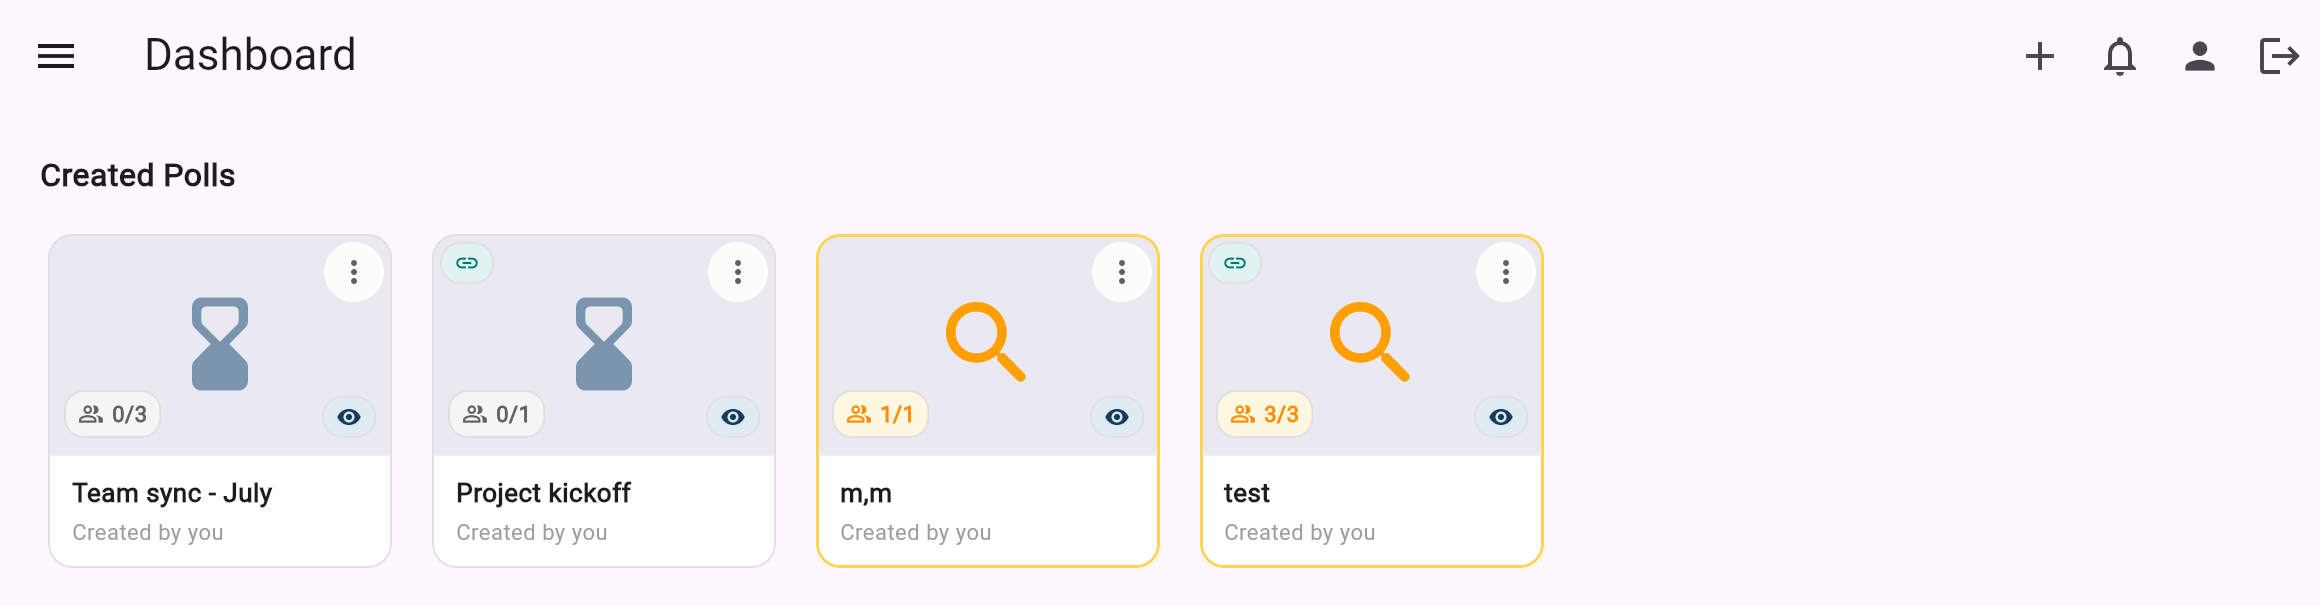
The My Polls dashboard. Each card shows the response count
(e.g. 0/3) and the poll name. Tap the + icon in the top bar to
create a poll; tap the ⋮ on a card to share, edit or delete it.
Create a poll
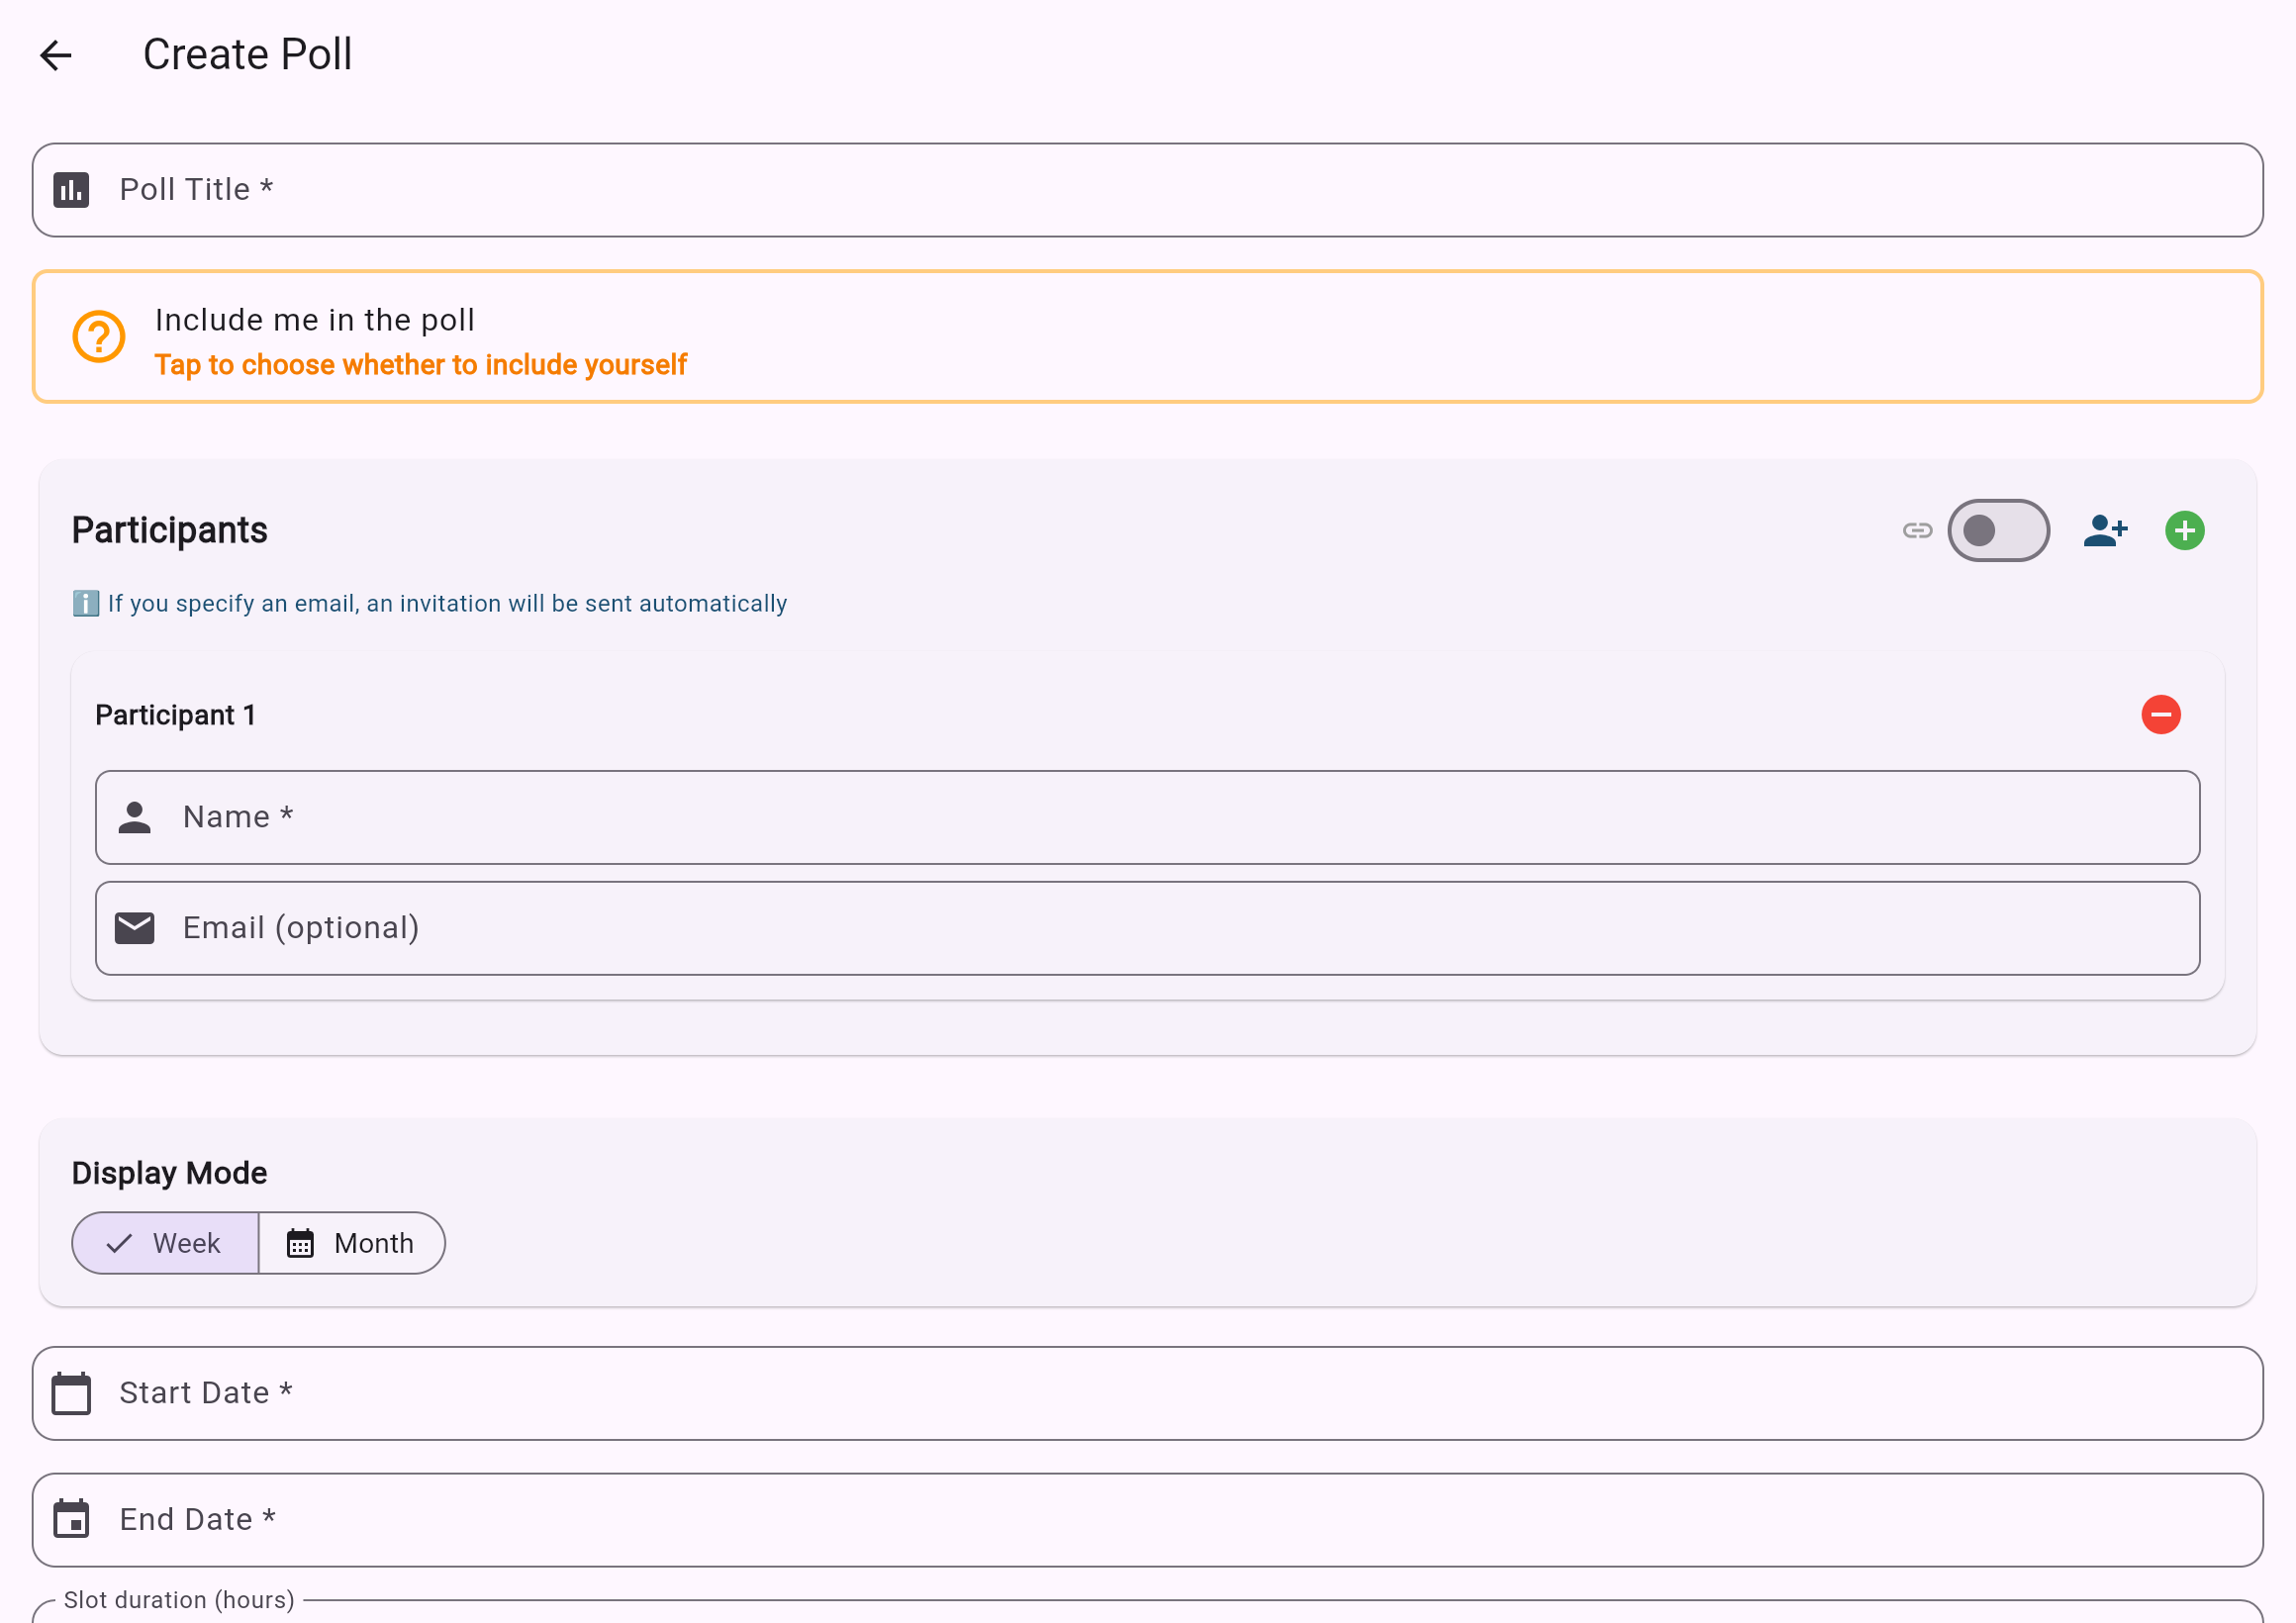
On the dashboard, tap the + icon in the top bar to open the form below.
The Create Poll form.
Fill the fields top to bottom — here is what each one changes:
Poll Title * — the name participants recognise (e.g. "Team sync – July"). Required.
Display Mode — choose Week to poll specific time slots, or Days to poll whole days.
Start Date * / End Date * — the date window shown to participants.
Slot duration (hours) — how long each candidate meeting lasts; it sets the size of a selectable block.
Hours — restrict the day to a working range. Leave it as 00:00–24:00 for the full day, or add ranges (e.g. 09:00–17:00) to hide nights.
Show other participants' responses — when on, everyone sees the group's availability; turn it off for a blind poll.
Open link registration — turn on to let anyone with the link self-join as a guest.
Participants — add a row per person with a Name * and optional Email. If you enter an email, Synqyo sends the invitation automatically.
Press Create at the bottom to save the poll and return to the dashboard.
Tip — with Open link registration on, you can set a maximum number of guests who may join through the shared link, or leave it unset for unlimited guests.
Poll options
Display Mode
Week polls specific time slots within each day; Days polls whole days only.
Hours
Limits the selectable part of the day. Default is the full day (00:00\u201324:00); narrow it to your working hours to hide the rest.
Show other participants' responses
When on, participants see the group's availability. Turn it off for a blind poll.
Open link registration
Lets anyone with the shared link self-join as a guest, up to an optional maximum.
Breaks & barriers
Under Advanced options when creating a poll or booking, you can carve
out time that should never be offered — a lunch break, weekends, a single blocked afternoon, or a
multi-day closure. There are two kinds, and the difference only matters when a meeting is longer
than one slot.
Break — a pause
A long meeting is allowed to span over a break and carry on afterwards. Think of a
lunch hour: a 2-hour meeting starting at 12:00 can pause over 13:00–14:00 and finish later. The
break simply shows up as a gap.
Untrepassable — a wall
A meeting can never cross a wall. If its duration would run into an untrepassable
period, that starting time is removed entirely. Use this for hard boundaries you must respect.
In both cases, a slot that begins inside a blocked period is never selectable.
The off-hours behaviour toggle decides whether the hours outside your working range
act as pauses (breaks) or as walls (untrepassable) — walls is the default.
Ways to describe blocked time
When you add a break or barrier, you choose one of these patterns:
Hour range
A band of hours on chosen days — e.g. weekdays 13:00–14:00 for a daily lunch break.
You can pick every day, weekdays, weekends, or a single weekday.
Days of the week
Blocks entire days — e.g. Saturday and Sunday — for their full 24 hours.
Date & time range
A one-off span between an exact start and end — e.g. 3 Aug 14:00 → 5 Aug 09:00. Unlike
an hour range it ignores the weekday and covers continuous time, so it can cross midnight and run
across several days. Ideal for a conference or a holiday shutdown. The end moment itself stays
available.
Tip — you can mix several patterns. For example: a daily lunch
break, a "no Friday afternoons" wall, and a date & time range wall for a
two-day office closure, all on the same poll.
Share & responses
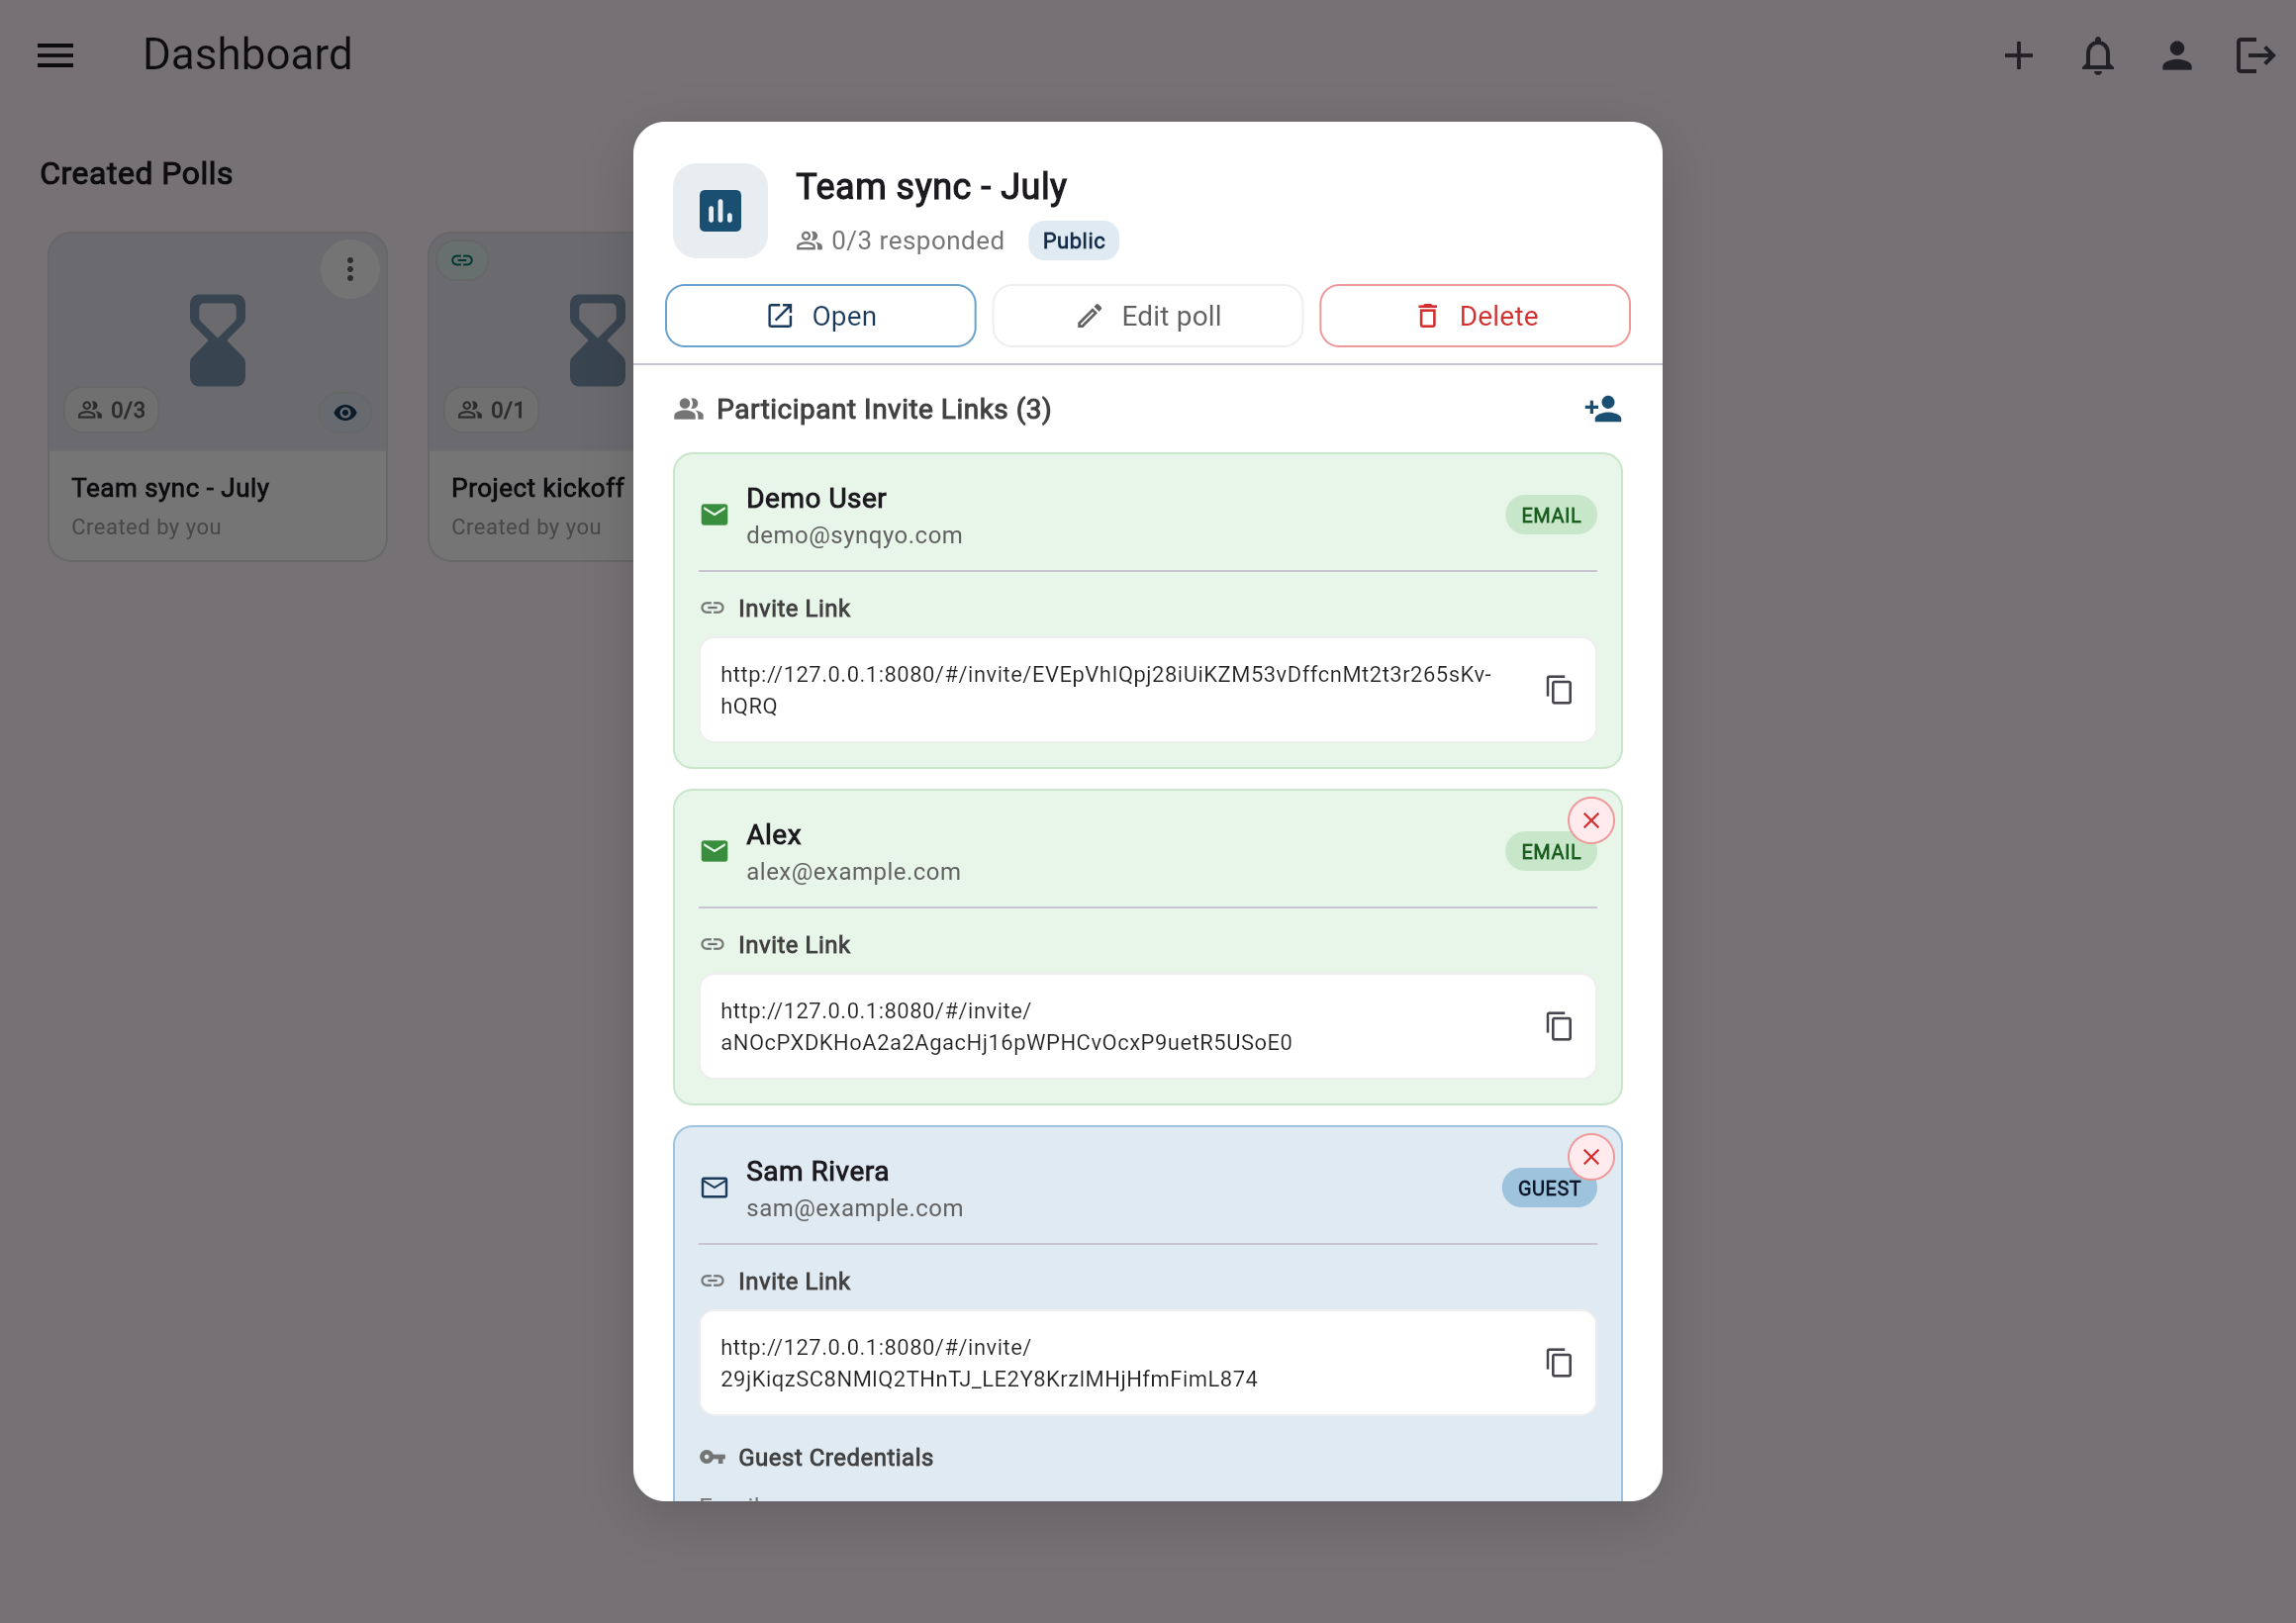
On the dashboard, tap the ⋮ menu on a poll card to open its details.
This panel lists every participant with their personal invite link.
The poll details panel: Open, Edit poll and Delete
actions at the top, and a copy button beside each participant's invite link.
Use the copy icon next to a name to grab that person's unique link.
Participants with an email receive their invitation automatically; guests get a private token link — no account needed.
As responses arrive, the response count on the dashboard card (e.g. 2/3) goes up and overlapping availability is highlighted.
About bookings
A booking is like a poll, but instead of finding one time that suits
the whole group, each invitee ends up tied to their own time slot — perfect for interviews,
office hours, or appointment sign-ups. You are always the organiser and never take a slot yourself.
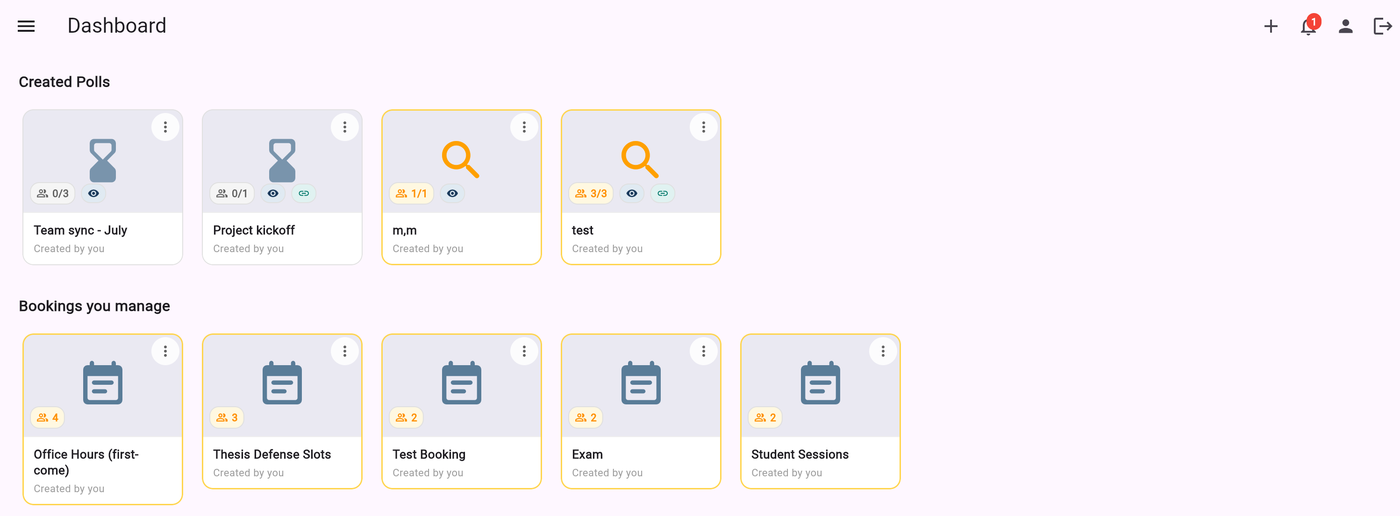
Bookings sit alongside polls on your dashboard. Create one from the +
menu in the top bar by choosing New booking. Each card shows the booking name and
how many invitees have responded.
There are two ways a booking can work — you pick one when you create it:
Collect availability, then assign
Invitees mark every time they are free (they never see each other). You then hand each person a
single slot yourself. Best for 1:1 interviews and office hours.
First-come-first-served
Invitees book a slot directly, and each slot fills up until it is full. Best for class sign-ups
and appointment grids. Names stay private.
Create a booking
From the dashboard, open the + menu in the top bar and choose New
booking. The form is much like a poll, with a couple of booking-specific choices.
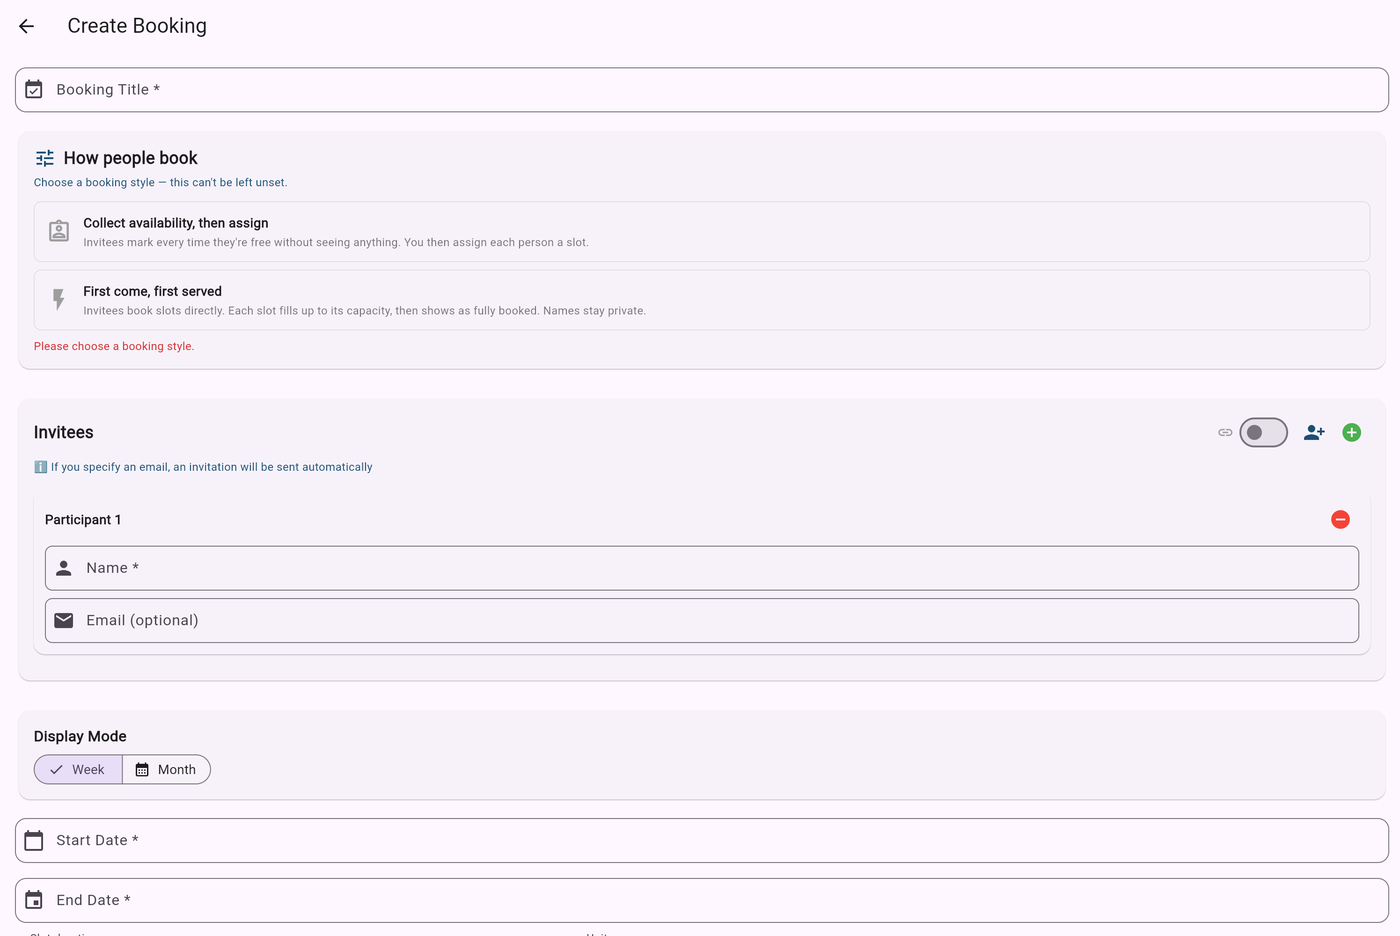
The Create Booking form. Pick the dates, hours, and how long each appointment lasts,
then choose the booking style.
Title * — the name invitees recognise (e.g. "Thesis defense slots"). Required.
Start / End date and Hours — the window offered to invitees,
exactly like a poll.
Appointment length — how long each slot lasts. A booking shows one cell per
appointment (not 15-minute sub-cells), so the length sets the size of each bookable slot.
Booking style — choose Collect availability, then assign or
First-come-first-served. This choice is required.
Max people per slot and Max slots per person — shown only for
first-come bookings: how many invitees may share one slot before it shows as full, and how many
slots a single person may grab.
Invitees — add a row per person with a name and optional email, just like a
poll. You are never added as a bookable participant.
Press Create to save and return to the dashboard, then share each invitee's link
the same way you share a poll.
Assign slots
For a collect-then-assign booking, once invitees have marked when they are free you open
the booking and switch to the assignment view to pin each person to a slot.
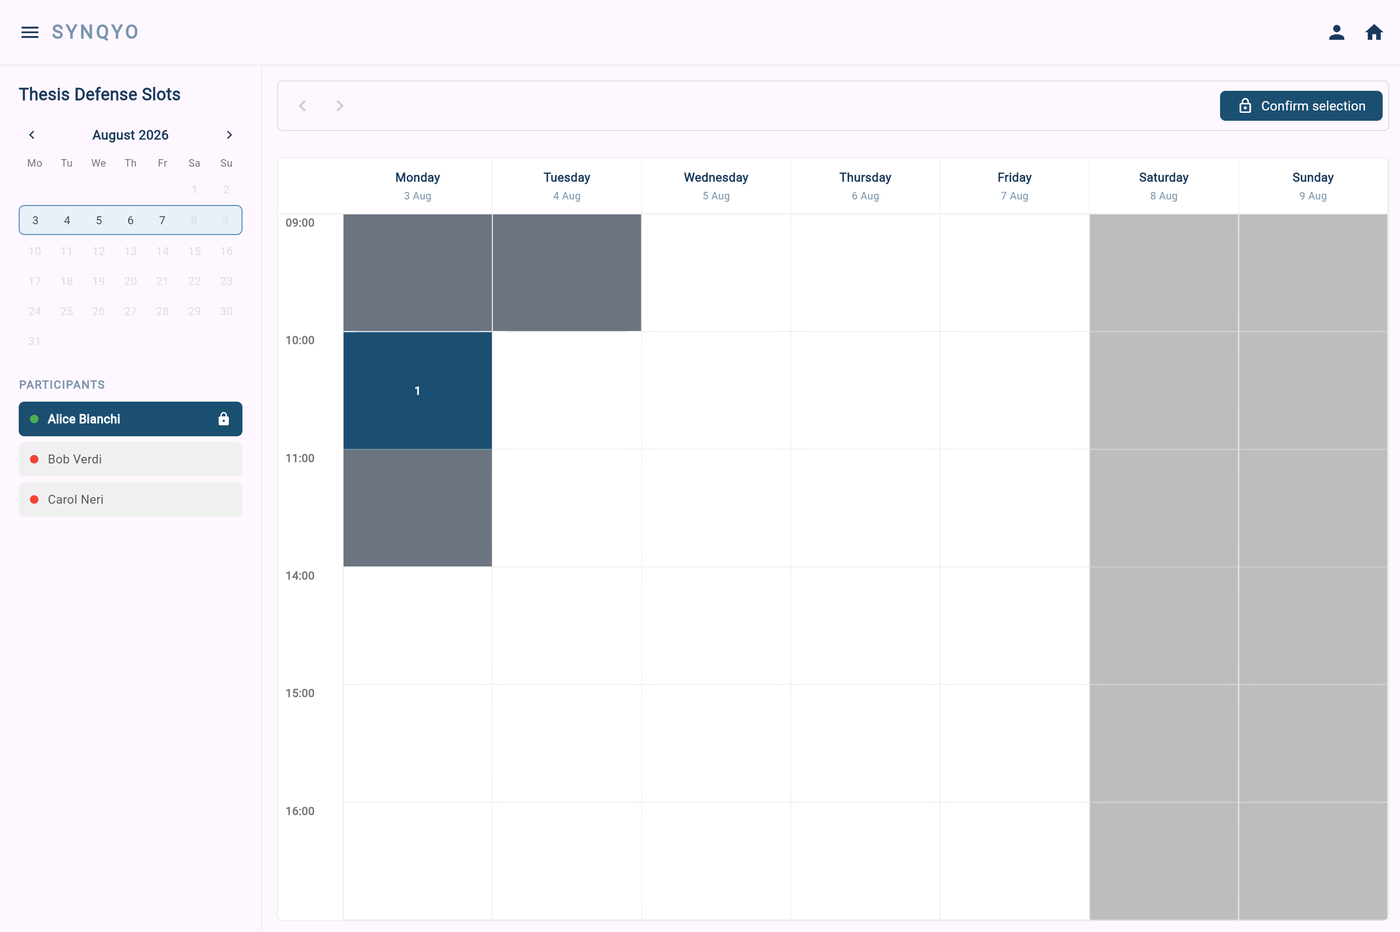
The assignment grid. Each invitee's availability is shaded grey; the slot you have
pinned to the selected person is drawn in dark navy.
Choose the person you want to schedule (from the list or drawer).
Click a free cell to assign them that slot. Click it again to clear it.
The grey shading shows where people are available, so you can avoid clashes at a glance.
When you are happy, confirm your selection. No email is sent automatically — you can copy the
appointment details (and a calendar link) to share with each person yourself.
Privacy — invitees never see each other's names or availability;
only you, the organiser, see the full picture.
First-come booking
In a first-come-first-served booking, invitees book their own slot directly — no assignment
step needed. Each slot fills up until it reaches the capacity you set.
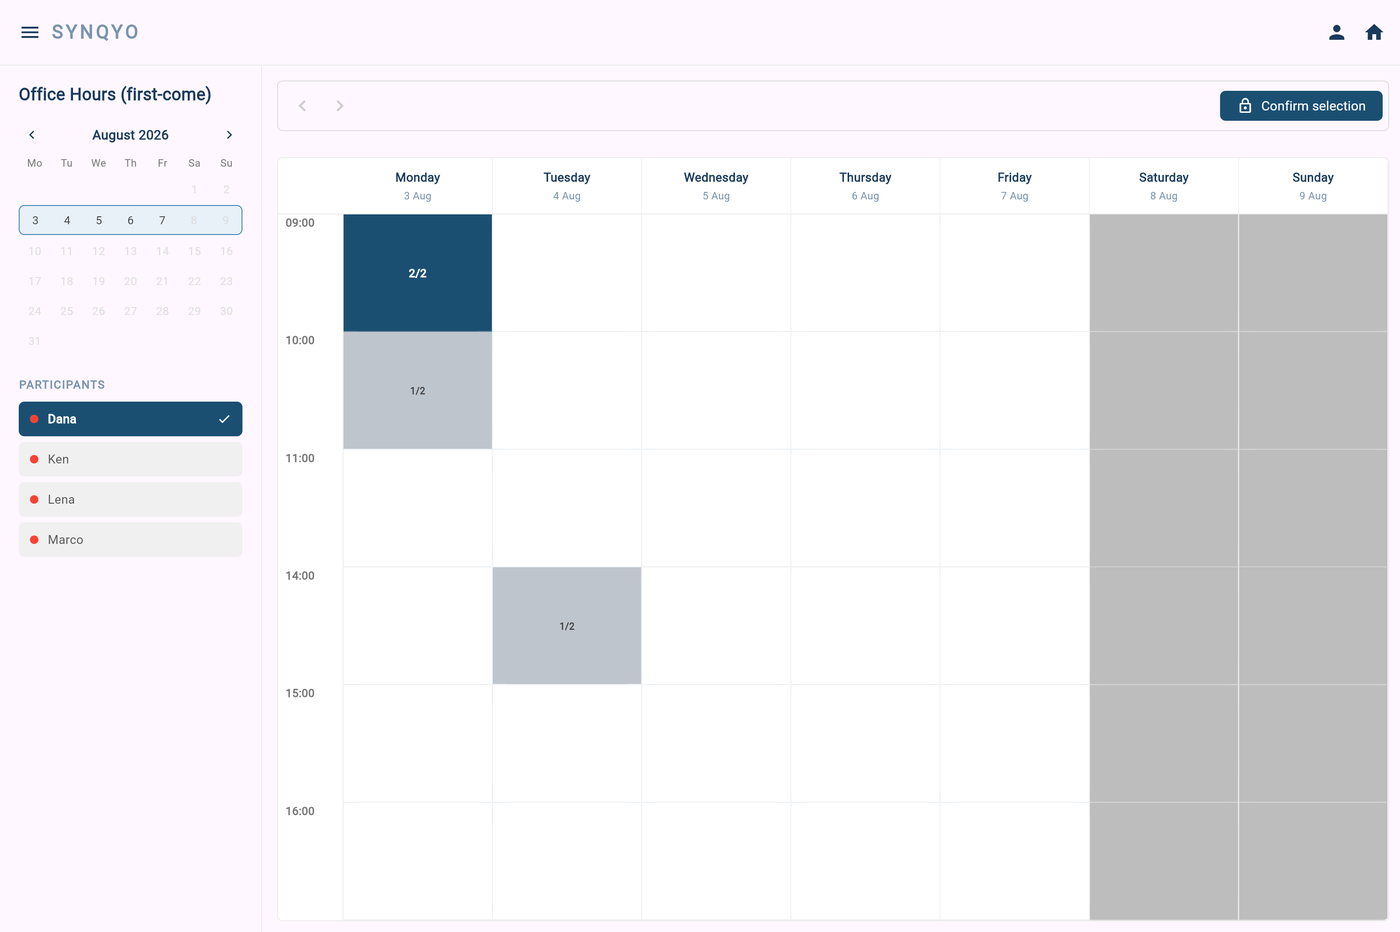
A first-come grid. Slots grow progressively darker grey as they fill up; a fully-booked
slot is shown in the darkest shade and can no longer be picked.
Invitees open their link and simply tap a free slot to book it.
Each slot shows how full it is; once it hits the max people per slot you set, it
locks and shows as full.
The max slots per person limit stops anyone booking more than their share.
As organiser you can still open the booking to review who booked what and rearrange if needed.
Tip — set max people per slot to 1 for exclusive
appointments, or higher for group sessions like workshops.
About guests
A guest is a lightweight participant you create and control — ideal for someone
without a Synqyo account. Guests respond through a private link, and you manage them from one place.
Note — a guest can later claim their profile and turn it into a
full account, keeping all their poll history.
Create a guest
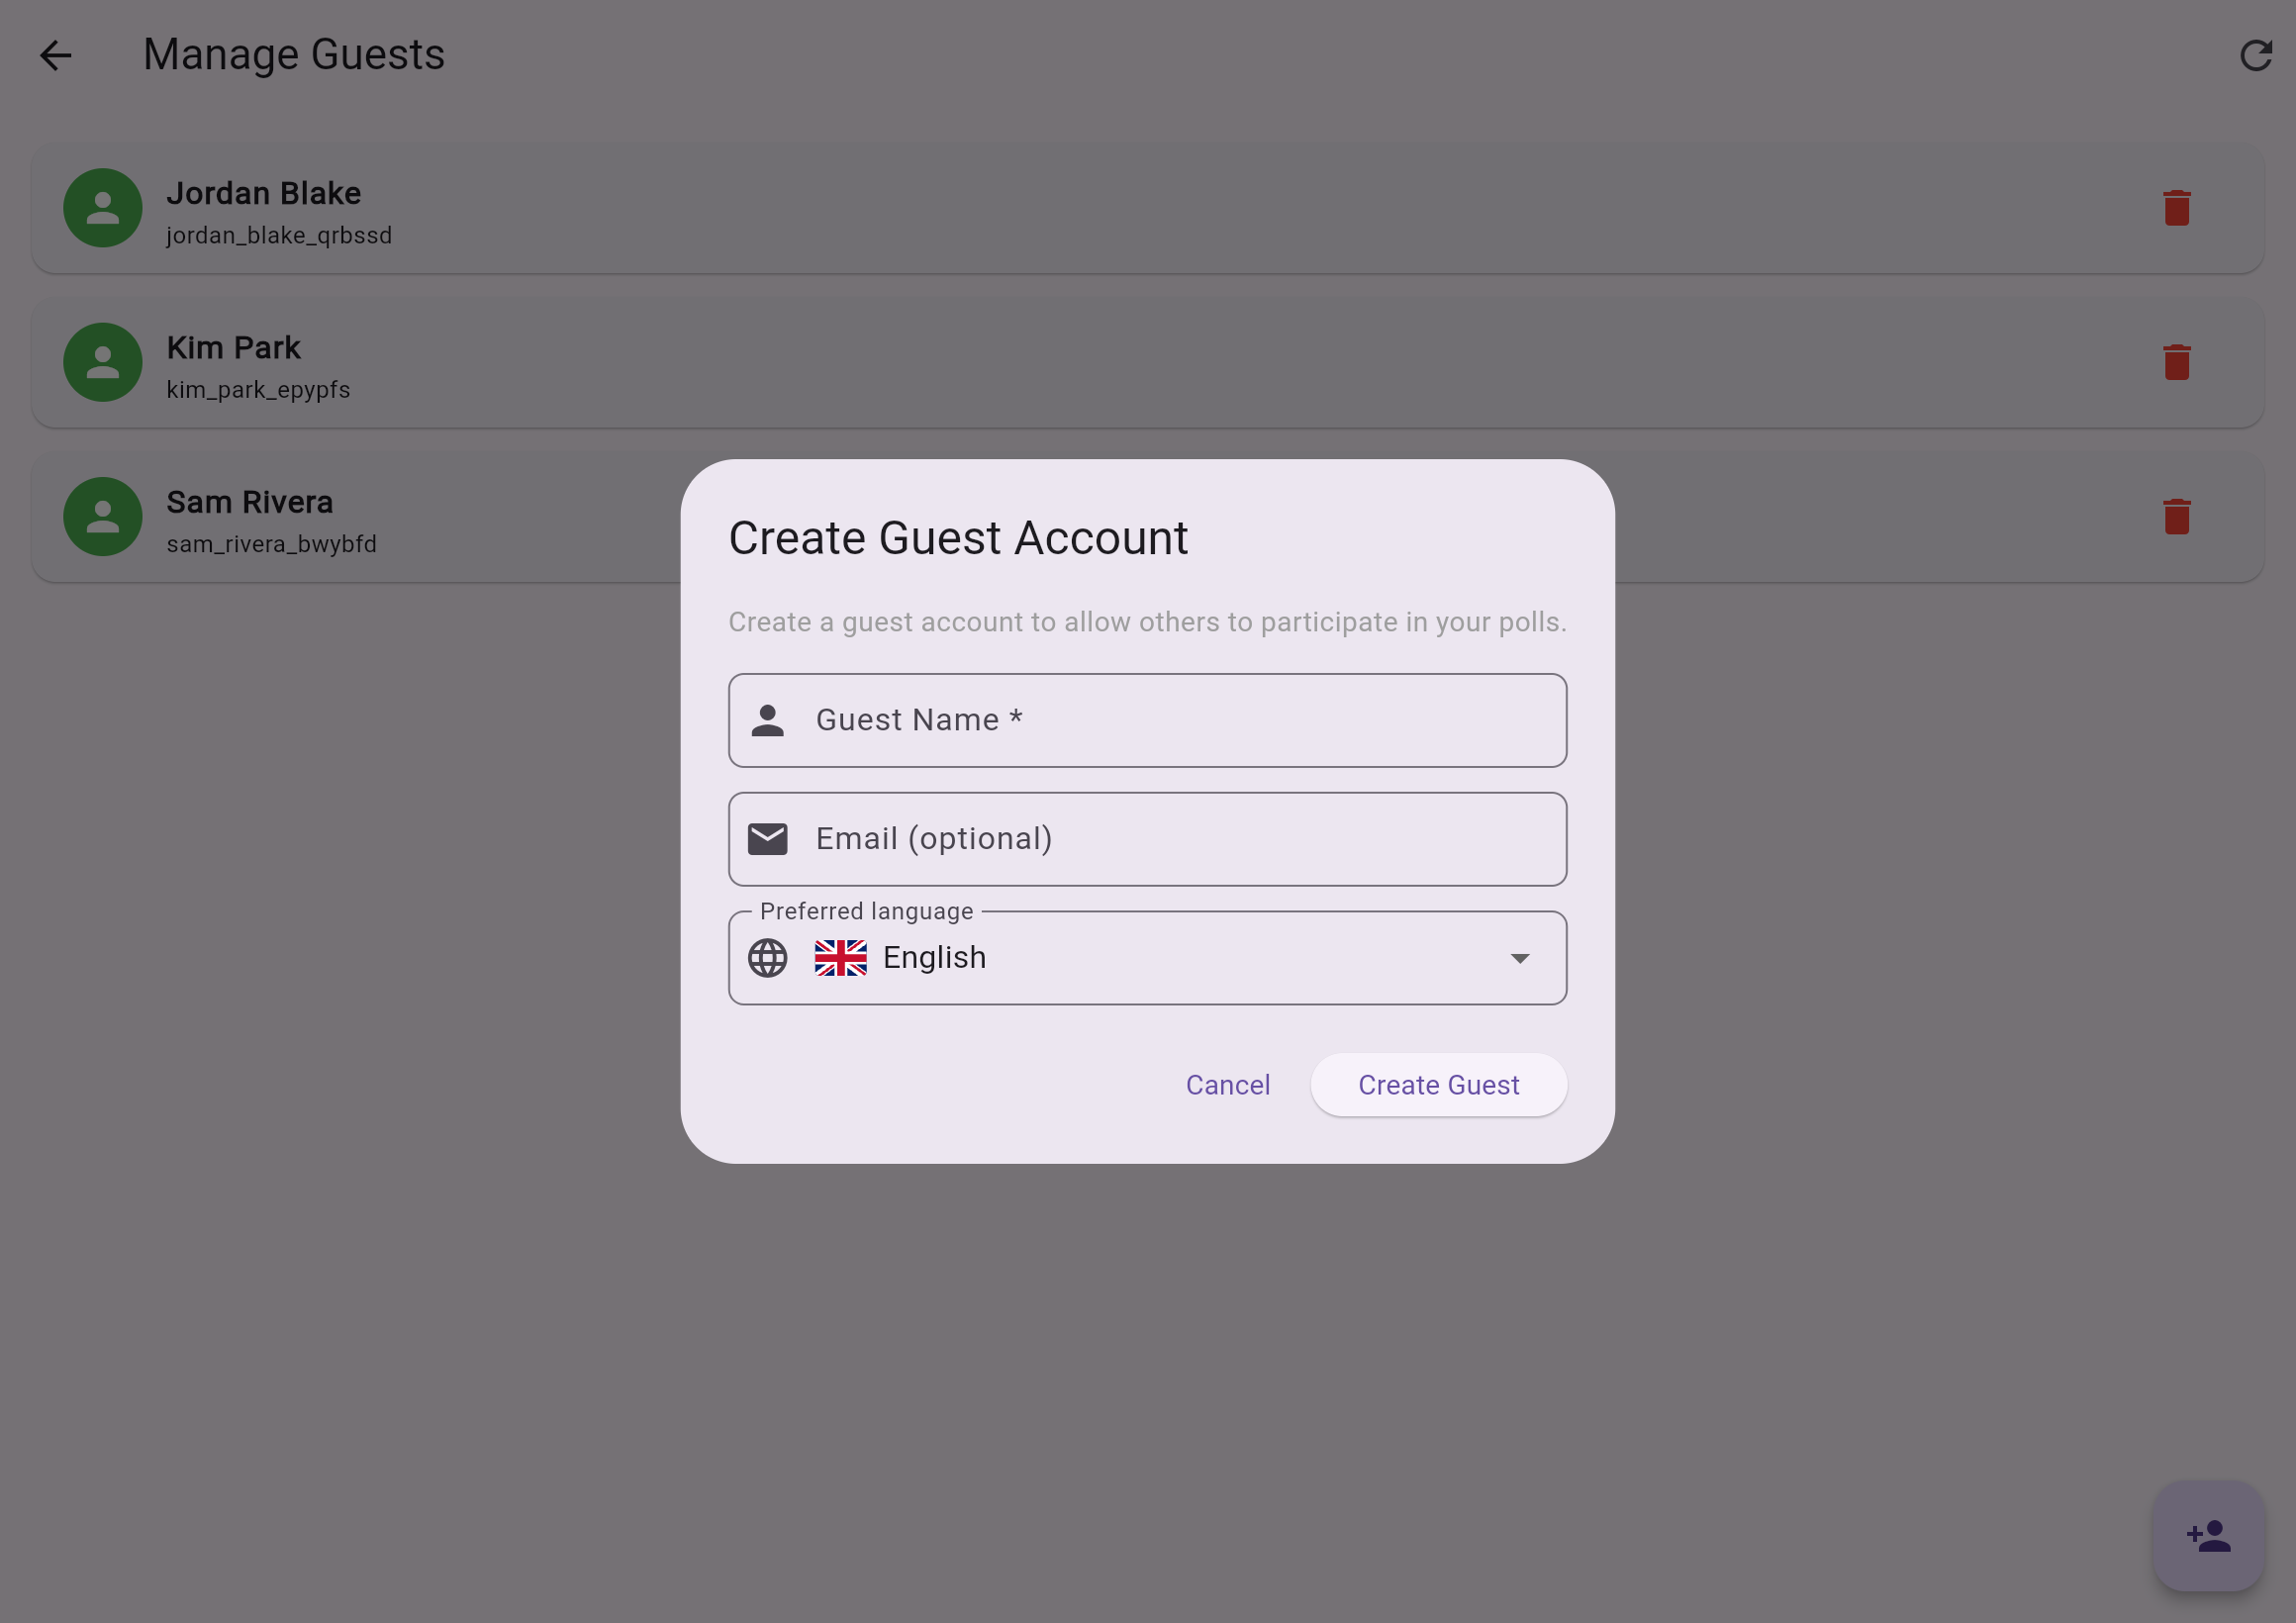
Open the side menu (the person icon → Profile, or the drawer) and choose
Manage Guests. On that page, tap the circular person-add button
in the bottom-right corner to open the dialog below.
The Create Guest dialog.
Name * — how you'll recognise the guest. Required.
Email (optional) — add one so Synqyo can email their invitation for you.
Language — the language their invitation and pages will use.
Press Create. Synqyo generates a unique guest ID and a private invitation link — copy it and share it.
Tip — while building a poll you can also add an existing guest directly as a participant.
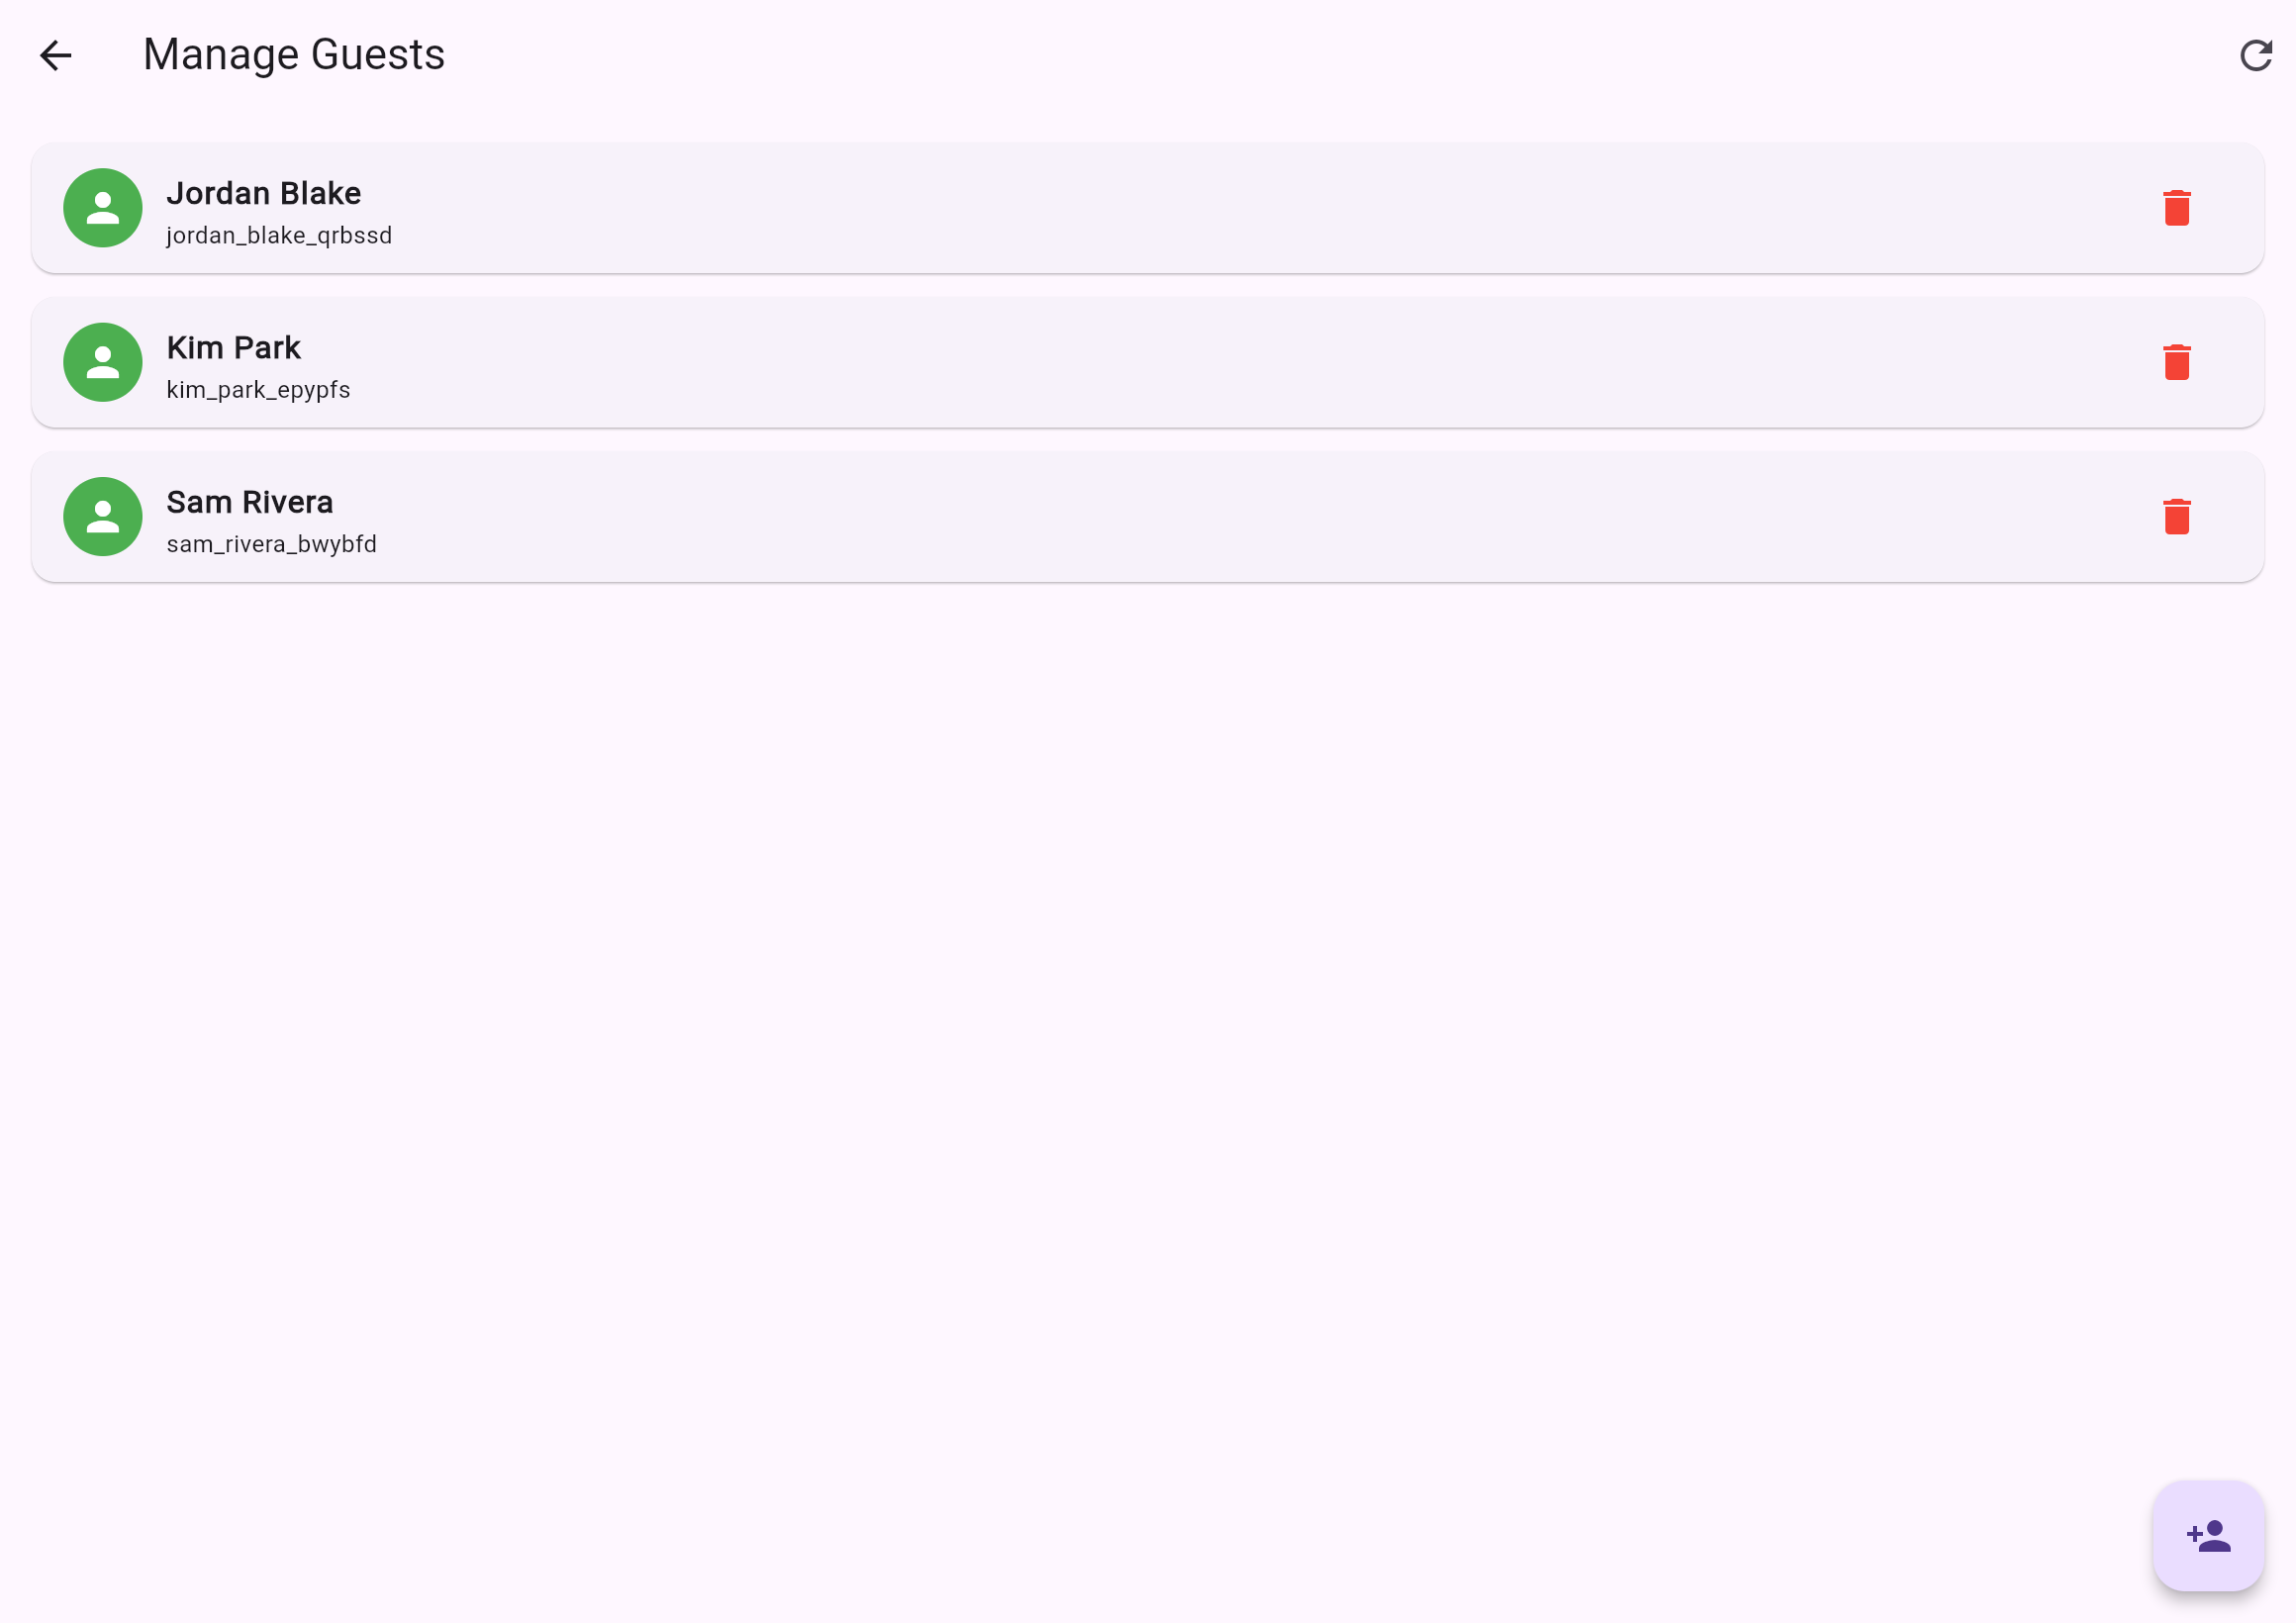
Manage guests
The Manage Guests page lists everyone you've created. Each row shows the guest's
name, their unique guest ID, and a coloured status dot (green = active, orange = expiring, red = deactivated).
The guest list. Tap a row to expand its details and actions.
Tap a row to expand
Reveals the email, creation and expiry dates, poll count and last access.
Edit email (pencil)
Add, change, or remove a guest's email address.
Delete (trash)
Deactivate a guest. They no longer appear in new polls, but their history is kept.
Restore
Shown on deactivated guests — brings them back with history intact.
Refresh (top bar)
Reload the list after changes.
Reminder — deleting a guest is reversible; use Restore to undo it.